Cloud Foundry - How to Bootstrap a System in Centos6

bootstrap

1)install febootstrap Febootstrap is a tool like debootstrap in ubuntu.
#yum -y install febootstrap
#febootstrap centos6 rootfs http://mirror.neu.edu.cn/centos/6.3/os/x86_64/
Threre is a basic centos system in rootfs dir.

2)install ruby 1.9 (optional) yum -y groupinstall "Development Tools"
yum -y install openssl-devel zlib-devel gcc gcc-c++ make autoconf readline-devel curl-devel expat-devel gettext-devel readline-devel

wget http://pyyaml.org/download/libyaml/yaml-0.1.4.tar.gz
tar xzvf yaml-0.1.4.tar.gz
cd yaml-0.1.4
./configure --prefix=/opt/soft/yaml
make && make install

wget http://ruby.taobao.org/mirrors/ruby/ruby-1.9.3-p286.tar.gz
tar xzvf ruby-1.9.3-p286.tar.gz
cd ruby-1.9.3-p286
./configure --prefix=/opt/soft/ruby --enable-shared --disable-install-doc --with-opt-dir=/opt/soft/yaml
make && make install
ln -s /opt/soft/ruby/bin/* /usr/bin/

gem source -r http://rubygems.org/
gem source -a http://ruby.taobao.org

gem install bundler --no-rdoc --no-ri
gem install rails --no-rdoc --no-ri
ln -s /opt/soft/ruby/bin/* /usr/bin/

3)install and start cgroups (optional) All of the configuration is here:
vi /etc/cgconfig.conf
Turn it on:
chkconfig --level 3 cgconfig on
chkconfig --list
service cgconfig start

4)turn off selinux vi /etc/selinux/config
Change SELINUX=enforcing to SELINUX=disabled

Reboot or run: setenforce 0

5)supper tool: ip in ssh1:
ip link add name FOO type veth peer name BAR
ip link set FOO netns 1
ifconfig FOO 10.254.0.222 netmask 255.255.255.252 up
ip link set BAR netns route add -host 10.254.0.221 dev FOO

in ssh2:
unshare -n /bin/bash
ifconfig BAR 10.254.0.221 netmask 255.255.255.252 up
ifconfig lo up

in ssh1:
ping 10.254.0.221

--------------EOF------------------
Ha ha, expect my next time write again, write here today, very tired of.

Cloud Foundry之warden代码解读-part3

warden 简介 cloudfoundry是vmvare推出来的开源PaaS平台,warden是其核心部分的资源管理容器,完成了各种资源分配的事情。

代码位置在: https://github.com/cloudfoundry/warden

根据part2里提到的过程,本节以create命令为例进行追踪。

调用过程:
bin/warden-repl >> lib/warden/repl.rb >> Warden::Client >> warden.sock >> lib/warden/server.rb << Warden::Server.run! << Rakefile
处理调用:
server.rb > ClientConnection > receive_request > process(request) > process_container_request(request, container) > base.rb > dispatch(request, &blk) > send(do_method, request, response, &blk) -> linux.rb > do_xxx > shell script

过程放大

一、进入repl命令行

1.1 名词

bundle:主要用于管理Ruby应用程序的依赖关系,并按照此依赖关系安装所需的Gems。当运行bundle install命令来安装Gems时,bundler会使用当前目录下的名为Gemfile的文件来处理依赖关系。
gem:就是ruby的软件包,一个gem就是一个ruby软件。
Gemfile:定义了各种依赖情况,bundler命令必须在存在此文件的目录下执行。
Gemfile.lock:记录本机目前所有依赖的gem命令和版本。
rake:编译工具,类似java的ant。
Rakefile:rake命令所定义的配置任务文件,类似ant.xml。

1.2 进入

#sudo bundle exec bin/warden-repl
使用bundle exec来保证项目依赖的gem版本。在bin目录下有warden-repl脚本(ruby),这将会执行lib/warden/repl.rb文件,先会使用Warden:Client发起对warden.sock的连接,然后在start方法中对命令行模式的交互进行反馈。

二、输入create 当输入create时,repl.rb执行到process_line中的respond_to的判断:

2.1 respond_to?

if respond_to? words[0].to_sym。。。
这种写法的意思是,当前对象中是否有方法名为words[0].to_sym变量值的方法。

2.2 create

repl.rb果断有这个create方法,然后talk_to_warden。就进入了client写的过程了。

三、warden收到create的响应

3.1 warden server的启动

早在part2中,使用了命令:
sudo bundle exec rake warden:start[config/linux.yml]
就已经启动了warden。
这将使在bundle定义的环境下,执行warden/warden/Rakefile里写好的任务:Warden::Server.run!。

3.2 warden server的响应

在lib/warden/server.rb中,run!方法下,使用了EM的start_unix_domain_server的方法启动了一个unixsock,第二个参数ClientConnection定义了接收到东西怎么处理。
ClientConnection中的process方法具体处理了create:

when Protocol::CreateRequest
container = Server.container_klass.new
container.register_connection(self)
response = container.dispatch(request)

container_klass为配置中的Warden::Container::Linux。

最终,将会执行linux.rb中的do_create方法。

四、shell脚本中的猫腻 warden/root/linux中,有大量的sh脚本,里面通过一系列的命令,完成了基础环境的搭建,非常值得一读。

4.1 linux/base/setup.sh

这个脚本在运行安装warden时会被执行,按照执行过程:
1)分析本机最近的apt源地址。
2)debootstrap到/tmp/warden中
3)debootstrap的作用见前面的文章,主要是可以用于在系统的某个目录中安装一套基本系统. http://www.54chen.com/architecture/cloud-foundry-warden-part1.html
4)使用chroot将子系统中的缺失软件安装好

4.2 base.rb的dispatch create过程

1)拼接before_create
2)执行 linux.rb中的 features/quota.rb的 before_create方法
2.5)执行base中的before_create方法,产生一个十六进制的handle值(也就是每个contaner的标识)
3)setquota
4)linux.rb do_create

4.3 linux.rb的do_create过程

1)create.sh脚本的执行:传入目录,检查是否存在;unshare -m setup.sh。
2)unshare的作用是在指定的环境下执行程序setup.sh,不影响上一级环境。
3)此处的setup.sh与base/setup.sh相比,没有了debootstrap的过程。
4)setup.sh中设置了cgroup、磁盘挂载、限额、网络。
5)紧接着如果需要会执行hook-parent-before-clone.sh
6)修改limits.conf的参数
7)执行start.sh:建立子网,打通两条ssh通道。
8)完成create

五、交互演示

$ sudo bundle exec bin/warden-repl
warden> list
["16bp35aue5i"]
warden> stop 16bp35aue5i
"ok"
warden> list
["16bp35aue5i"]
warden> destroy 16bp35aue5i
"ok"
warden> list
nil
warden> create
16bp35aue5j
warden> info 16bp35aue5j
{"state"=>"active",
"host_ip"=>"10.254.0.5",
"container_ip"=>"10.254.0.6",
"container_path"=>"/tmp/warden/containers/16bp35aue5j",
"memory_stat"=> <:protocol::inforesponse::memorystat cache: rss: mapped_file: pgpgin: pgpgout: swap: pgfault: pgmajfault: inactive_anon: active_anon: inactive_file: active_file: unevictable: hierarchical_memory_limit: hierarchical_memsw_limit: total_cache: total_rss: total_mapped_file: total_pgpgin: total_pgpgout: total_swap: total_pgfault: total_pgmajfault: total_inactive_anon: total_active_anon: total_inactive_file: total_active_file: total_unevictable:>,
"cpu_stat"=> <:protocol::inforesponse::cpustat usage: user: system:>,
"disk_stat"=> <:protocol::inforesponse::diskstat bytes_used: inodes_used:>}

warden> spawn 16bp35aue5j w
2 warden> link 16bp35aue5j 2
exit status: 0

stdout:
03:18:51 up 29 days, 14:51, 0 users, load average: 0.00, 0.04, 0.05
USER TTY FROM LOGIN@ IDLE JCPU PCPU WHAT

stderr:

Cloud Foundry之warden代码解读-part2

warden

简介 cloudfoundry是vmvare推出来的开源PaaS平台,warden是其核心部分的资源管理容器,完成了各种资源分配的事情。

代码位置在: https://github.com/cloudfoundry/warden

代码结构 |-- em-warden-client 基于eventmachine的client 依赖 warden-client与warden-protocol 通过 unix socket来通讯
|-- warden 巨复杂的warden实现,大部分是shell脚本+ruby,还有两个c实现。
|-- warden-client 客户端驱动,提供与warden的阻塞式通讯client。依赖warden-protocol。其中的V1.rb对各自command进行解析之后的处理。这里有一个v1mode的概念, v1mode使用字符串,转为pb后与其他的一起使用protobuf。
`-- warden-protocol 依赖beefcake(protobuf library for Ruby)。protocol下有所有支持的pb生成格式。

小坑:ruby中的send方法 send其实就是动态地根据名字调用函数,传递后面的内容作为调用参数,api函数原型为:
obj.send(symbol [, args...]) => obj

在V1.rb中,所能的convert_xxxx_request方法都是这样被调用到的。

专注warden实现 src下四个C程序:
|-- clone 用来快速复制一个环境 夹杂一堆的shell在其中运行
|-- iomux 分成两个部分:iomux-spawn把子进程的pid写到stdout来标示它已经做好准备接收连接。在尝试连接之后一直等待。iomux-link是用来根据pid重新link到其上去。
|-- oom 通过eventfd得到内存不够的通知
`-- repquota 报告quota使用情况

四个c程序将在编译后复制到root/linux/skeleton/bin中

其他目录: |-- bin 下面有两个脚本文件,用来启动和进入命令行的
|-- config 下面有一个配置文件,定义了linux下的配置
|-- lib 所有的ruby代码
|-- root 各种shell脚本,作cgroup之类的

启动warden 环境:
chenzhen@ubuntu-chenzhen:~/warden/warden$ lsb_release -a
No LSB modules are available.
Distributor ID: Ubuntu
Description: Ubuntu 12.04 LTS
Release: 12.04
Codename: precise

$cd warden/warden
$sudo bundle exec rake setup[config/linux.yml]
$sudo bundle exec rake warden:start[config/linux.yml]
$ctrl+z
$bg
$sudo bundle exec bin/warden-repl
$ping
...pong

调用过程:

bin/warden-repl >> lib/warden/repl.rb >> Warden::Client >> warden.sock >> lib/warden/server.rb << Warden::Server.run! << Rakefile

处理调用:

server.rb > ClientConnection > receive_request > process(request) > process_container_request(request, container) > base.rb > dispatch(request, &blk) > send(do_method, request, response, &blk) -> linux.rb > do_xxx > shell script

clone.c分析: src/clone/clone.c: main ->
console.c: openpty ->
clone.c: daemonize ->
barrier.c: barrier_open ->
clone.c: run("./hook-parent-before-clone.sh"); ->
clone.c: parent_clone_child -> clone.c: pid = clone(start, stack, flags, h); -> clone.c: start() -> console_mount(&h->console, "dev/console"); -> pivot_root -> clone.c: run("./hook-parent-after-clone.sh"); -> clone.c: barrier_signal(&h->barrier_parent); -> clone.c: barrier_wait(&h->barrier_child);

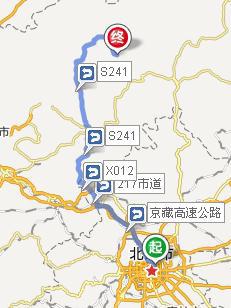
丰宁坝上草原自驾游

秋高气爽,正直周末,我米东方时尚小分队一行十一人三辆车,浩浩荡荡二次出行。
目标: target

一出门在八高小堵: 堵车

出了,一路都是这样的感觉: 好天气

当时有两个小时的土路它是这个样子的: road

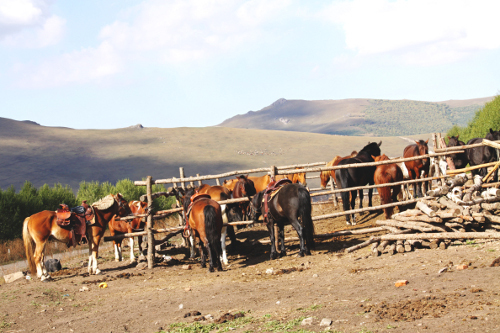
七小时后到达目的地,马不停蹄,开骑: 马

当地的养马的农民在山顶上休闲地抽烟: 赶马的大叔

马到成功: 马到成功

农民家看马的大,一只耳朵总是耷拉着: 大

第二天,自行活动时摄影师拍摄: 坝上

随便都是桌面一张: 桌面

期待下次出行!

Cloud Foundry之warden代码解读-part1

warden

简介 cloudfoundry是vmvare推出来的开源PaaS平台,warden是其核心部分的资源管理容器,完成了各种资源分配的事情。

代码位置在: https://github.com/cloudfoundry/warden
这一部分也是我最想了解细节的地方,因为在一个paas平台中,资源的隔离才是最有价值的部分。

基础知识

rv = unshare(CLONE_NEWNS);
unshare这个调用,可以把挂载的文件系统设置成只在新的挂载命名空间(mount namespace)中可见。

execvp(argv[0], argv);
execvp()会从PATH 环境变量所指的目录中查找符合参数file 的文件名,找到后便执行该文件,然后将第二个参数argv传给该欲执行的文件。

shopt -s nullglob
设置shell环境变量nullglob的值为on,nullglob为on时对于通配符匹配时,若匹配不到时为空(相对应的为通配符本身)。

int stat(const char *restrict pathname, struct stat *restrict buf);
提供文件名字,获取文件对应属性。

build-essential软件包
作用是提供编译程序必须软件包的列表信息,也就是说编译程序有了这个软件包,它才知道 头文件在哪,才知道库函数在哪,还会下载依赖的软件包,最后才组成一个开发环境。

工具debootstrap
可以用于在系统的某个目录中安装一套基本系统,这个基本系统除了一些配置项外,与ubuntu安装程序在安装的第一阶段安装的内容基本相同。这项功能有许多有趣的功能,例如,你可以从某个定制版本的ubuntu Live光盘上通过这个命令快速的在硬盘上安装ubuntu而不需要ubuntu的安装程序,也可以把创建在硬盘上的基本系统目录作为某些涉及系统安全性服务的chroot运行环境,通过chroot进入该目录并调试和运行一些可能修改系统配置的应用程序,作为定制小型系统模板等等。

aufs
一种文件格式,可以mount到目录,同时控制只读和读写。

overlayfs
另一种文件格式,在ubuntu 11.04后开始替代aufs作为官方livecd的文件格式。

Cloud Foundry之dea代码解读

cloudfoundry

简介 cloudfoundry是vmvare推出来的开源PaaS平台,dea(DropletExecution Agent)是其应用运行的环境,一个DEA可以启动多个应用。
代码位置在: https://github.com/cloudfoundry/dea
这一部分也是我最想了解细节的地方,因为在一个paas平台中,资源的隔离才是最有价值的部分。

初始版的dea基本不控制系统资源,然后基于cgroup搞了一个warden(真正的资源隔离是它,下节再述),程序运行容器。cf希望warden运行在多个平台上,所以没有直接使用LXC。 代码 代码入口在lib/dea.rb:

EM.epoll
EM.run {
agent = DEA::Agent.new(config)
agent.run()
}

EM是ruby有名的eventmachine,是一个事件驱动网络框架,从java程序员的角度,可以理解有点像mina,也可以认为有点像erlang的gen_server。

然后进到lib/dea/agent.rb:

NATS.start(:uri => @nats_uri) do ...

里面注册了各种各样的收到对应消息干什么活的定义,我们来看其中几条线:
1. 收到update:
NATS.subscribe('dea.update') { |msg| process_dea_update(msg) }
上一句是说收到update的指令, process_dea_update里面关键的一句:
register_instance_with_router(instance, :uris => (uris - current_uris))
通过NATS告诉router,新的app来了。

2.收到start:
NATS.subscribe("dea.#{uuid}.start") { |msg| process_dea_start(msg) }
在process_dea_start里面:
start_operation = lambda do... 把app下载回来,修改好权限什么的。
下面用了fiber(它是ruby里的协程,用来达到异步线程的效果,但是开销要比线程低):
f = Fiber.new do..
f.resume
在协程中,最关键的调用:
stage_app_dir(bits_file, bits_uri, sha1, tgz_file, instance_dir, runtime)
bind_local_runtime(instance_dir, runtime)
startup_contents.gsub!('%VCAP_LOCAL_RUNTIME%', runtime['executable']) // 替换运行时路径
File.open(startup, 'w') { |f| f.write(new_startup) } #写入运行的脚本
一切就绪之后,调用先前准备好的lambda:
start_operation.call
然后去运行各种shell命令,包括启动应用。

__EOF__

Cloud Foundry之router代码解读

cloudfoundry 简介 cloudfoundry是vmvare推出来的开源PaaS平台,router是其所有请求的入口路由,其与nginx进行配合完成各种情况情况下的转发。
代码位置在:https://github.com/cloudfoundry/router

第一版的router直接通过unix sock将http request通过nginx的proxy 发到了router.rb中处理,第二版的时候,因为ruby直接处理请求性能不行,换成了lua脚本来接收请求,再由ruby程序将结果返回。

目录结构 router代码不多,共有下面的一些主要目录。

.
├── bin
│ └── router (启用router server的脚本)
├── config
│ ├── router2.yml
│ └── router.yml (配置文件,指定了服务的端口和消息队列pid等)
├── ext
│ └── nginx
│ ├── tablesave.lua
│ └── uls.lua (这两个lua脚本供nginx conf使用,实现用户第一次访问时生成一个cookies,lua让其去同一个地方)
├── Gemfile
├── Gemfile.lock
├── lib
│ ├── router
│ │ ├── const.rb
│ │ ├── router.rb
│ │ └── router_uls_server.rb (基于一个简单的web框架(Sinatra)开发的一些http api)
│ └── router.rb(负责整体启动router的http server)
├── LICENSE
├── NOTICE
├── Rakefile
├── README
└── spec
├── functional
│ ├── router_spec.rb
│ └── spec_helper.rb
├── integration
│ ├── router_spec.rb
│ └── spec_helper.rb
├── lib
│ ├── nats_timeout.rb
│ └── spec_helper.rb
├── Rakefile
├── spec_helper.rb
└── unit
└── router_spec.rb

nginx的关键配置 nginx对接的配置在https://github.com/cloudfoundry/vcap/blob/master/dev_setup/cookbooks/nginx/templates/default/router-nginx.conf.erb,是动态生成的,在安装时决定。
其中,关键的内容是:
#定义lua运行的环境
lua_package_path "/?.lua;;";
lua_package_cpath "/?.so;;";
#upstream定义到nls服务上
upstream router_status {
server :;
}

其中,根据 health_monitor的值穿插了subrequest去query /vcapuls的subrequest,而 /vcapuls是接到router.sock的。

简单地说,第二版的变化在于,大量的业务请求在health_moniter确定之后,变成了nginx直连下属业务,而不再经过router了。

学到什么 1.nginx_lua相当好用,还得感谢之前的老同事agentzh他们的贡献;
2.router用http这么来回的搞感觉不如tcp来得靠谱。